The Blog
'A Student of Haute Couture', Senior Thesis
The Inspiration
Spending my summer in Lebanon, learning the ropes directly from big-shot couture names, taught me way more than those expensive textbooks I've been lugging around in my four years as an Apparel Design major.

In the heart of Lebanon, I didn't just pick up the technical stuff about couture. I also got a front-row seat to the stories woven into each garment. Every stitch had a tale that screamed Lebanese culture. The couture pieces I got to work on oozed Lebanese glam and showed off the dedication and skills that define couture in this region. It was more than fashion; it was like time, talent, and cultural identity all sewn into every piece.
What really hit me was how short-lived these couture creations are. Despite the crazy effort and time put in, these outfits only get their moment in the spotlight for a few hours. Classic Lebanese – all about that brief, intense beauty.


Being in those ateliers wasn't just about couture artistry; it was like diving into the heart of Lebanon. This experience has left me with some unforgettable memories and insights, reshaping how I see the mix of culture, craftsmanship, and the fleeting charm of couture, and overwhelming sense of inspiration. Suddenly, I wasn't just a student of apparel design; I was an aspiring creator, eager to translate the lessons learned into my own couture masterpiece. I wanted to create more than just a gown; I aspired to craft an haute couture masterpiece that would serve as a living testament to the essence of Lebanese couture, my heritage, and the person I am today.
Lebanese couture isn't just about fashion; it's a celebration of identity, a nod to the rich history and cultural nuances that shape the narrative of a people. I wanted my gown to echo those sentiments, to be more than a piece of clothing but a cultural ambassador. I could feel the gown taking shape in my mind on my flight back, embodying the fusion of tradition and modernity. It wasn't just about replicating what I learned; it was about evolving it, infusing my personal touch, and creating something that felt uniquely mine.

The journey from the bustling ateliers of Lebanon to the quiet solitude of my design studio was a seamless transition, guided by the echoes of mentorship and the whispers of creativity that lingered in my mind. The months spent learning from the best were now manifesting in every carefully chosen detail, turning my vision into a tangible reality.
In the next chapter of this blog, I'll delve deeper into the creative process, sharing the highs, lows, and unexpected discoveries that accompanied the making of my haute couture gown. Stay tuned as we explore the intersection of tradition and innovation, heritage and personal expression, in the art of couture design.
Laying the Foundation
Moving forward with my couture journey, I knew wanted to make a gown that I could personally wear in the near future. This prompted a dive into my extensive fabric collection. Among the textiles I've gathered over the years, I spotted an exquisite French black lace that I got 6 years ago from Beirut. I only had a small amount of it, so it became the starting point for shaping the design of the dress.
But, I felt the need for an extra layer of glam, a touch more vibrancy to elevate the dress to its full potential. I started searching for beaded and embroidered tulles, I envisioned an extra layer that would harmonize with the delicate texture and floral pattern of the French lace and to add just the right amount of weight to the overall feel of the gown.
Enter a beautiful pale pink and light gold beaded lace. Heavy and intricately detailed, it was beautiful, but the color was a problem. It was too light, creating a sharp contrast against the deep black lace. In that moment, a thought sparked: "What happens if I dye it?" And so, my journey into the realm of experimentation commenced.
Searching the internet for answers to the many questions flooding my mind — "Will the pearly finish of the beads chip off? Will the lace get damaged? What if it turns an ugly color?" — I found myself on a quest for the perfect transformation. I was looking for an old-timey tint, so I opted for a 'chocolate brown' synthetic fabric dye, carefully testing different concentrations and immersion times.

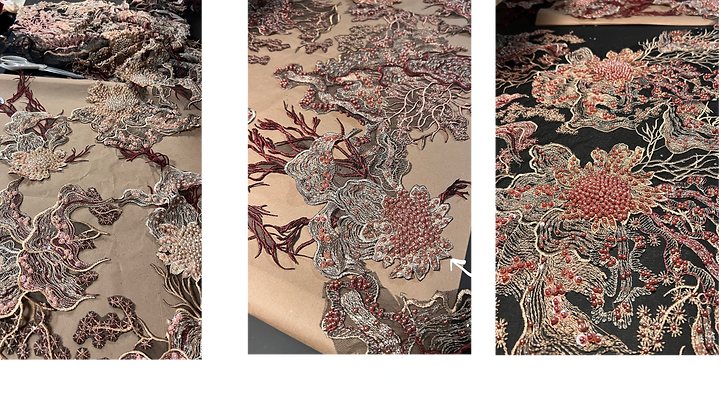
With just 4oz of dye and 30 minutes of soaking, the lace underwent a remarkable change. The overall color muted and darkened, the glass beads intensified in shine, and the pearls transformed into a beautiful dusty peach. It now has much more character and charm, just what I envisioned.
With the freshly dyed lace, I was able to finalize the design of the dress. The overall silhouette, it has a straight neckline with detachable long sleeves and I opted for a column dress, since I knew I would be working with a very limited amount of that French lace. It will be heavily embellished with the beaded appliqués and black beaded fringe starting at the hem and faded out upwards. I want a semi-translucent feel to the dress, looking as if the delicate French lace is laid directly on my skin, so I know I will not be lining the dress in black and will use skin-tone fabric for the understructure.


I experimented with various layers of fabric to achieve the desired effect. After testing combinations of nude-toned organza, black organza, nude tulle, and black tulle, I settled on a composition of one layer of nude organza, one of nude tulle, one of black tulle, followed by black crinoline, and finally, the pièce de résistance – the French lace adorned with the resplendent beaded appliqué.


Getting to Work
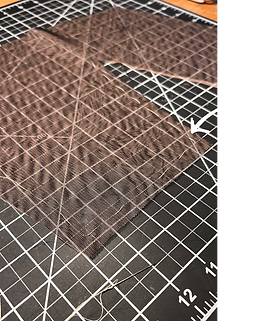
Moving forward, the intricate beaded lace needed meticulous preparation. I carefully trimmed away the embroidery from its mesh background, envisioning an overlay onto the French lace to fuse them seamlessly. I trimmed as close to the embroidery as possible without accidentally cutting the embroidery thread. I used a small lighter to help in the trickier spots or when I would get a loose thread. After long hours of trimming away, I ironed each individual piece upside down and laid them flat on the table until I needed them. To ensure the structural integrity of the dress, a layer of stiff crinoline was added beneath the lace, to bear the weight of the beading without compromising the overall strength.
On to the next step: pattern-making. I started with the bodice draft which began with design lines taped onto my body double dress form. Muslin draping was cut and formed to follow the design lines and the patten created. First was a nine-panel, hip-length corset as the foundational layer, and adding high-density boning for support. A basic strapless bodice with a waist dart and an ankle-length column skirt with waist darts followed.


Beginning with the structure, I assembled the main understructure: the corset. I cut it out from a nude-toned organza that matched my skin tone and made matching tone boning channels too. The first fitting was of the corset, to adjust the neckline and length of the bodice.
Next, I cut out the first layer of bodice and skirt out of nude and black tulle. Then, a second fitting with these layers pinned to the corset. I chose the length of the skirt.
Tricky fabrics like fine tulle and lace I used to always avoid sewing as a student. I didn’t want to go through the trouble of the fabric getting stuck, the needle pull acting up, or the machine literally eating the fabric. When sewing two layers of tulle, I layered a letter-size paper under the fabric to stabilize it and avoid it getting stuck. It pulls through easily, and then just tear off the paper when done. But sewing four layers together, there was no trouble and no need for the paper hack.
As for sewing the slippery organza, I made sure to add plenty of notches to the pattern to make sure everything stays aligned. I also did a type of stay stitch, a technique I learned in a Beirut atelier called “tenbeet”, which made the layers of fabric act as one when passing through the machine or draping. I made sure the hand-stitch was done while having the fabric laying as flat as possible and keeping the edges of the fabric aligned. These methods I used for the first three layers of the dress made sure I got the most accurate outcome for the best fit.

Now, I have completed and fitted the first three layers: the corset, and the two layers of tulle. Next up is the crinoline.
For the fourth layer, I utilized the same pattern as the preceding layer and incorporated 3/4 inch ease to the hipline. Considering that the crinoline is notably stiff and the skirt silhouette is straight, a slit has also been added to the center back of the skirt.

The Couture Ways
Finally, we arrive at the pièce de résistance—the black French lace. The technique I used to drape this patterned lace is an ingenious idea I learned known as “incrustée,” an inlaying technique that follows the fabric's pattern during draping rather than cutting it based on a flat pattern. The result is a seamless effect, with no harsh seams or darts disrupting the continuous pattern.
To maintain precision, I aligned the edge trim of the lace with the neckline, letting the shape of each subsequent piece depend on the one before it. This process required meticulous hand-stitching and a keen attention to detail.
However, witnessing the end results, I'm convinced it was unquestionably worth it— even before adding the final intricate beaded layer, the dress already embodied a work of art.
The next step involved more hand-stitching, another round of “tenbeet” to secure the lace onto the crinoline, using black thread. This technique prevents the lace from gaping and gives it an overall cleaner finish. These stitches were either points or irregular lines, depending on the pattern and the inlay, opting for whichever would be most concealed in each section.


To Be Continued....